It’s a hot afternoon, and the kids just came in from playing outside, sticky and hungry. I’ve got just enough time to whip up some Mini Fruit Pizzas before they raid the pantry for snacks. These little treats are a total crowd-pleaser and don’t require any fancy baking skills (trust me on this).
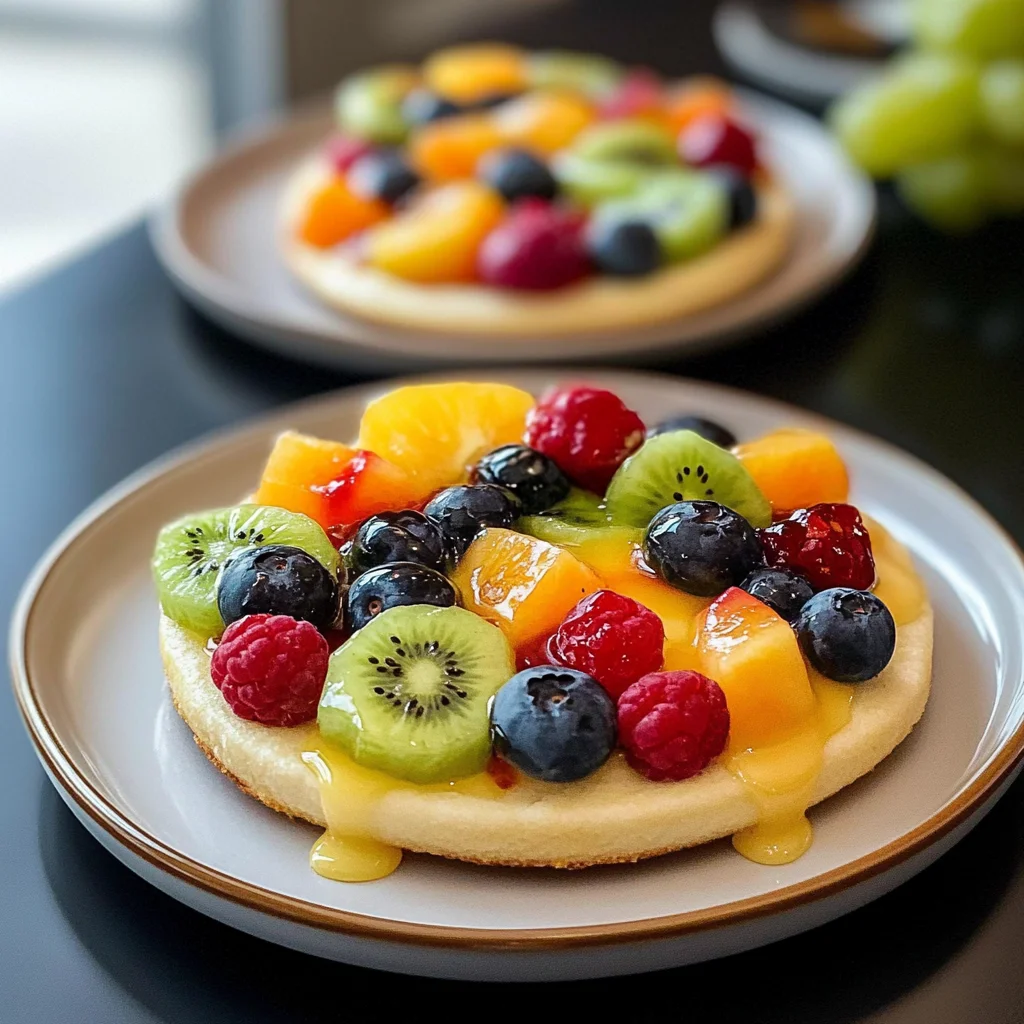
Perfect for afternoons when you’ve got little ones bouncing off the walls and a fridge full of fresh fruit. Unlike traditional fruit tarts, these are made with a buttery cookie base that bakes in under 12 minutes. Quick, fun, and super colorful—what’s not to love? Time to dig in!
Why You’ll Love This Mini Fruit Pizzas
- Super Easy: Just mix, bake, and top — it takes no time at all (perfect for when you’re short on energy).
- Creamy Delight: The smooth cream cheese layer adds a melty-gooey richness that pairs perfectly with the fruit.
- Fresh Flavors: Load it up with whatever fruit you have on hand — strawberries, blueberries, or even kiwi work like a charm!
- Fun for Kids: It’s a great way to get the little ones involved in the kitchen (but be ready for some messy hands).
- Make-Ahead Potential: You can prep the bases in advance and assemble them right before serving, which is a lifesaver during busy weeks.
Mini Fruit Pizzas Ingredients
For the Base:
all-purpose flour (2 cups) — Use Bob’s Red Mill for consistent results, or your dough’ll be a flop.
granulated sugar (1 cup) — Don’t skip the sugar; it balances flavors or your pizzas’ll taste bland.
butter (1 cup) — Use unsalted butter; otherwise, it’ll be way too salty for dessert.
egg (1 large) — Don’t substitute with egg whites; you need the yolk for richness.
vanilla extract (1 teaspoon) — Use pure vanilla extract, not imitation, or your flavor’ll fall flat.
baking powder (1/2 teaspoon) — Don’t skimp on baking powder; otherwise, they’ll come out dense and sad.
salt (1/4 teaspoon) — A pinch of salt’s essential; skip it and your sweetness’ll be overpowering.
For the Topping:
cream cheese (1 cup) — Use full-fat cream cheese, or it’ll be too runny and won’t hold up.
powdered sugar (1/2 cup) — Don’t swap powdered sugar with granulated, or your frosting’ll be gritty.
vanilla extract (1 teaspoon) — Go with seasonal fruits; frozen won’t have the same vibrant flavor and texture.
mixed fresh fruit (2 cups)
Full measurements in the recipe card below.
How to Make Mini Fruit Pizzas
1. Preheat Oven: Preheat your oven to 350°F (175°C). This is crucial for getting those cookie bases nice and golden-edged.
2. Cream Butter & Sugar: In a large bowl, cream together the softened butter and granulated sugar until light and fluffy. You’ll know it’s ready when it looks pale and airy.
3. Add Egg & Vanilla: Beat in the egg and vanilla extract until fully incorporated. It should look smooth — don’t rush this step!
4. Combine Dry Ingredients: In another bowl, whisk together the flour, baking powder, and salt. Gradually add this mixture to the wet ingredients, mixing until combined (you don’t want any dry bits left!).
5. Scoop Dough: Drop tablespoon-sized amounts of dough onto a baking sheet lined with parchment paper, spacing them a few inches apart. And don’t overcrowd them — they need room to spread!
6. Bake Cookies: Bake for 10-12 minutes, or until the edges are lightly golden. Watch out here — if you leave them too long, they’ll go from golden to burnt in about 30 seconds.
7. Cool & Top: Once baked, allow the cookie bases to cool completely before topping them with your cream cheese mixture and fresh fruit. The cookies need that time; otherwise, everything gets melty-gooey (not in a good way!).
Exact quantities in the recipe card below.
How to Store Mini Fruit Pizzas
- Room Temperature: These are best eaten fresh, but if you have leftovers, keep them in an airtight container for up to 2 days. Just know the fruit might get a little mushy.
- Refrigerator: Pop them in a covered container for about 3-5 days. The cream cheese layer can get a bit firm, so let ’em sit out for a few minutes before serving again.
- Freezer: You can freeze the cookie bases for up to 2 months. Just wrap each one tightly in plastic wrap and stick ’em in a freezer-safe bag. The toppings don’t freeze well (trust me on this), so wait until you’re ready to enjoy them.
- Reheating: If you want to serve them warm, pop the cookie bases in the oven at 300°F for about 5 minutes until they’re just warmed through (you’ll smell that buttery goodness). Then add your fresh toppings after!
What to Serve with Mini Fruit Pizzas?
These little treats are sweet and creamy, so you’ll want sides that offer a refreshing balance or a different texture. Here are some pairings that work great:
- Lemon Sorbet: The tartness cuts the sweetness, giving your palate a bright refreshment between bites.
- Grilled Chicken Salad: The savory flavors and crisp greens provide a nice texture contrast without overwhelming it.
- Chilled White Wine: A crisp, cold glass offers an acidity balance that brightens the creaminess of the toppings.
- Fresh Mint Tea: The herbal notes bring a cooling effect, making each sweet bite feel lighter (brew for 5 minutes).
- Sliced Avocado: Its creamy texture adds depth while keeping things interesting; plus, it’s super easy to prep!
- Fruit Kabobs: Stack assorted fresh fruits on skewers for an easy side that plays up the color contrast (no cooking needed).
- Coconut Yogurt: Swap in this tangy alternative for added creaminess and a tropical vibe — super simple to dollop on top!
I’d go with any of these options to keep things fun and balanced!
Mini Fruit Pizzas Variations
Here’s how to play with this recipe and make it your own!
- Citrus Zest: Add 1 tablespoon of lemon or orange zest to the cream cheese mixture for a bright, zesty twist.
- Chocolate Drizzle: Drizzle melted chocolate on top of the fruit for a melty-gooey finish before serving.
- Nutty Crunch: Sprinkle chopped nuts (about 1/4 cup) on top of the fruit for extra texture and flavor.
- Berry Blast: Swap out mixed fruits for just berries — strawberries, blueberries, and raspberries work beautifully together.
- Gluten-Free Base: Replace all-purpose flour with a gluten-free blend in equal amounts if you need to skip gluten.
- Cream Cheese Swirl: Mix in 1/4 cup of peanut butter into the cream cheese topping for a rich, nutty upgrade.
- Mini Fruit Pizzas Sandwiches: Layer two cookie bases with the cream cheese in between for a fun treat!
Make Ahead Options for Mini Fruit Pizzas
I love prepping the bases for my Mini Fruit Pizzas ahead of time. You can bake those cookies up to two days in advance and store them in an airtight container at room temperature. Just wait to spread the cream cheese mixture until you’re ready to serve—trust me, it tastes best fresh! The fruit toppings are also something I like to prepare just before serving, or they’ll get mushy in the fridge (and nobody wants that). So, keep those cookie bases safe and sound while you tackle the cream cheese layer and fruit last minute. Keep it simple and enjoy!
Mini Fruit Pizzas Recipe FAQs
Can I make Mini Fruit Pizzas ahead of time?
You can definitely prep these ahead! Just make the cookie bases and store them in an airtight container for a couple of days. The cream cheese topping should be made fresh, though, since it tastes best that way. If you want to save time, slice up your fruit the night before (just keep it covered to avoid browning). This way, assembly is a breeze when you’re ready to serve!
What’s the best way to store this dish?
Store these cuties in an airtight container in the fridge. They’ll last about 2-3 days, but be warned: the fruit may start to get a bit mushy if left too long. If you’re worried about soggy cookies, keep the toppings separate and assemble right before serving. You’ll want that crisp-tender base paired with fresh fruit — trust me on this!
Why did my Mini Fruit Pizzas turn out flat?
If they flattened out, it’s likely your butter was too warm or you didn’t use enough baking powder. Make sure your butter’s softened but not melted (you want it creamy). Also, don’t skip on that baking powder! You should see a little puffiness when they come out of the oven; if not, something went wrong along the way.
Can I substitute any ingredients in this recipe?
You could swap out the mixed fresh fruit for whatever’s seasonal or on sale (berries work great!). But don’t skimp on quality ingredients like butter and cream cheese; using low-fat versions will leave you with weird textures and flavors. And please don’t use granulated sugar instead of powdered sugar for the frosting — that’ll just ruin everything!
Final Thoughts on Mini Fruit Pizzas
These Mini Fruit Pizzas are all about that creamy, rich topping that contrasts beautifully with the soft base. Seriously, once you spread on that cream cheese mixture and top it with fresh fruit, you’ll see why these are a hit. Plus, they come together quickly, which is a lifesaver when you’re short on time (and energy). If you’ve been putting this off, tonight’s the night. Trust me; you’ll want to whip these up for your next get-together or just because! Drop a comment if you added anything — I’m always curious.
Mini Fruit Pizzas
Ingredients
Method
- Preheat the oven to 350°F (175°C).
- In a large bowl, cream together the softened butter and granulated sugar until light and fluffy.
- Beat in the egg and vanilla extract until fully incorporated.
- In a separate bowl, whisk together the flour, baking powder, and salt. Gradually add this to the wet mixture, mixing until combined.
- Drop tablespoon-sized amounts of dough onto a baking sheet lined with parchment paper, spacing them a few inches apart.
- Bake for 10-12 minutes, or until the edges are lightly golden. Remove from the oven and allow to cool completely.
- In another bowl, mix together the softened cream cheese, powdered sugar, and vanilla extract until smooth and creamy.
- Once the cookie bases have cooled, spread a generous layer of the cream cheese mixture on each cookie.
- Top the cream cheese layer with a variety of mixed fresh fruit.
- Serve immediately or refrigerate until ready to serve.