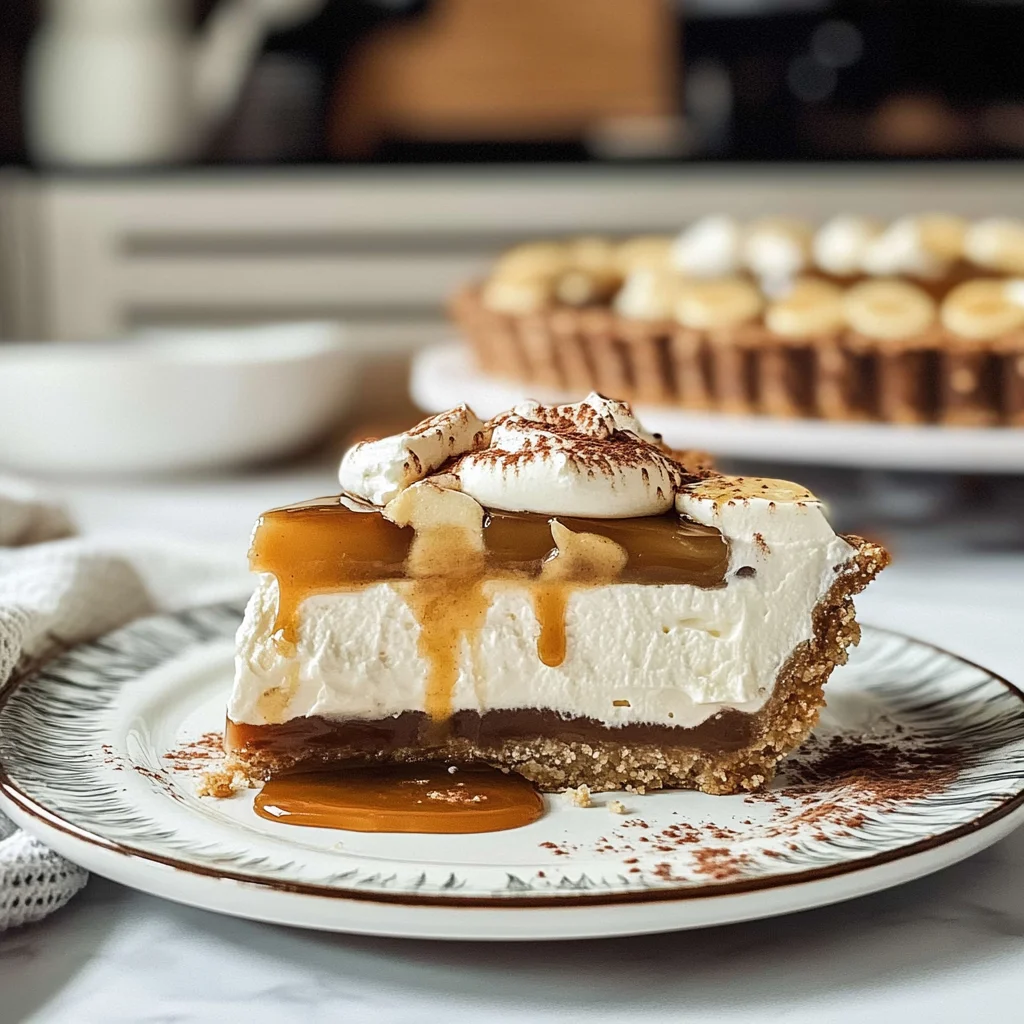
It’s a Wednesday night, and I’ve got some overripe bananas staring at me. I can’t let them go to waste, but I don’t want to whip up another smoothie. Banoffee Pie it is! It’s a quick, no-bake dessert that layers sweet bananas with rich toffee and fluffy whipped cream — all on a buttery biscuit base.
This dish is perfect for nights when you need an impressive dessert but don’t have hours to spend in the kitchen (trust me on this). Plus, using sweetened condensed milk saves time while still delivering that sticky-sweet toffee goodness. You’ll definitely want seconds.
Why You’ll Love This Banoffee Pie
- Super Easy: Just a few simple steps, and you’ve got a showstopper dessert that looks fancy but is totally doable.
- Sticky-Sweet Flavor: The blend of bananas, toffee, and whipped cream creates a luscious mix that’ll have you going back for seconds.
- Decadent Texture: You’ll love the contrast between the crisp base, gooey toffee, and airy whipped cream — it’s a total treat!
- Perfect for Sharing: It’s great for gatherings or when you want to impress friends, just know it’s best eaten fresh (so don’t make too far in advance).
- Customizable Goodness: Feel free to add chocolate shavings or even some nuts on top — it’s super versatile!
Banoffee Pie Ingredients
For the Base:
digestive biscuits (200 grams) — Crush those digestive biscuits finely or you’ll end up with a crumbly mess.
unsalted butter (100 grams) — Use real unsalted butter, not margarine, or your crust won’t hold together.
For the Toffee Layer:
sweetened condensed milk (1 can) — Go for Carnation sweetened condensed milk; other brands just don’t have that rich flavor.
unsalted butter (1 tablespoon) — Don’t skimp on the brown sugar, or your pie’ll lack that deep, caramel vibe.
brown sugar (1 tablespoon) — Use ripe bananas, not green ones, or they’ll taste bland and ruin the pie.
For the Topping:
bananas (2 large) — Chill your heavy whipping cream before whipping, or it won’t whip up nicely.
heavy whipping cream (300 ml) — Sift the powdered sugar to avoid lumps, or it’ll ruin your cream texture.
powdered sugar (2 tablespoons) — Use pure vanilla extract, not imitation, or the flavor’ll fall flat.
vanilla extract (1 teaspoon) — Get Dutch-process cocoa powder for a deeper taste, or your filling’ll be too bitter.
For Garnish:
cocoa powder (1 tablespoon) — Don’t skip the chocolate shavings; they add crunch, or it’ll just be a mushy mess.
chocolate shavings (1 tablespoon)
Full measurements in the recipe card below.
How to Make Banoffee Pie
1. Crush the Biscuits: Crush those digestive biscuits into fine crumbs using a food processor or place them in a zip-lock bag and smash with a rolling pin until they’re fine.
2. Mix the Base: In a bowl, mix the biscuit crumbs with 100 grams of melted unsalted butter until it’s combined well. Press this mixture into the bottom of a 9-inch pie dish to form an even base.
3. Chill the Base: Refrigerate for 10 minutes to set. You want it firm enough to hold the filling together — you’ll know it’s ready when it feels solid to the touch.
4. Make the Toffee: In a saucepan, combine one can of sweetened condensed milk, 1 tablespoon of unsalted butter, and 1 tablespoon of brown sugar (if you’re using it). Cook over medium heat for about 5-10 minutes, stirring constantly until it thickens and turns a beautiful caramel color.
5. Pour Over Base: Remove from heat and let it cool slightly (don’t rush this — if you pour it too hot, your base might melt). Pour the warm toffee over your chilled biscuit base.
6. Add Bananas: Slice your ripe bananas and arrange them evenly over that luscious toffee layer; they should be nice and golden, not green (trust me on this).
7. Whip Cream Topping: Now in a separate bowl, whip together 300 ml of heavy whipping cream with 2 tablespoons of powdered sugar and 1 teaspoon of vanilla extract until stiff peaks form — you’ll know it’s ready when it holds its shape beautifully.
8. Assemble & Chill: Spread that whipped cream evenly over the bananas, dust with cocoa powder for a nice finish, and sprinkle on chocolate shavings if you’re feeling fancy! Chill for at least 30 minutes before slicing into your Banoffee Pie.
Exact quantities in the recipe card below.
How to Store Banoffee Pie
- Room Temperature: It’s best to keep this pie in the fridge, but if you have to leave it out for a short while, cover it with plastic wrap. Just don’t let it sit out for more than 2 hours.
- Refrigerator: Store slices in an airtight container or cover the whole pie with plastic wrap. It’ll stay fresh for about 3 days, but the bananas might brown a bit (don’t worry, still tasty!).
- Freezer: Honestly, I don’t recommend freezing Banoffee Pie. The texture can go all wonky when thawed, especially the cream and bananas. If you must freeze it, wrap individual slices tightly in plastic wrap and foil for up to 1 month.
- Reheating: You usually won’t need to reheat this pie, but if you want a slightly warm slice (trust me on this), just pop it in the microwave for about 10 seconds. Look for a slight melt in the whipped cream—it’s surprisingly good that way!
What to Serve with Banoffee Pie?
It’s sweet enough to enjoy on its own, but a few sides can really balance the richness. Here are some ideas:
- Coffee: A warm cup cuts through the sweetness and complements the chocolate notes perfectly.
- Vanilla Ice Cream: Cold and creamy, it adds a smooth texture contrast that keeps each bite feeling light.
- Fresh Berries: Try raspberries or strawberries for a tartness that slices through the sweetness beautifully.
- Lemon Sorbet: This icy treat offers a refreshing acidity that brightens up each forkful — plus, it only takes 5 minutes to scoop!
- Greek Yogurt: A dollop of tangy yogurt balances the sweetness nicely; just add a drizzle of honey for extra flavor.
- Mint Tea: The herbal notes and warmth provide a comforting finish after the sugar rush from this dish.
- Chopped Nuts: Sprinkle some toasted hazelnuts on top for an added crunch and a nutty flavor — just toast them for about 5 minutes in the oven.
- Coconut Whipped Cream: Swap out regular whipped cream for this dairy-free option; it adds a tropical flair that pairs well with bananas.
Banoffee Pie Variations
Here’s how to play with this recipe and make it your own.
- Nutty Crunch: Add 50 grams of crushed nuts (like pecans or walnuts) to the biscuit base for extra texture.
- Caramel Kick: Stir in an extra tablespoon of brown sugar when making the toffee layer for a richer flavor.
- Banana Swap: Use 2 large ripe strawberries instead of bananas if you’re feeling fruity (add them after the toffee layer).
- Chocolate Drizzle: Drizzle melted chocolate over the whipped cream topping before dusting with cocoa powder for a sweet finish.
- Spiced Cream: Mix in ½ teaspoon cinnamon with the powdered sugar while whipping the cream for a warm, cozy twist.
- Next Level Toffee: Try adding a pinch of sea salt to the toffee layer right before pouring it over the biscuit base; it’s divine!
- Creamy Layers: Fold in 100 grams of mascarpone cheese into the whipped cream for an even creamier topping.
Make Ahead Options for Banoffee Pie
I love prepping the base and toffee layer ahead of time. You can make those up to two days in advance and store them in an airtight container in the fridge. Just press the biscuit base into the pie dish and let it chill, then cook the toffee mixture and pour it over when it’s cool. The bananas don’t hold well, so I slice them right before serving — they get mushy otherwise (trust me). For the whipped cream, you can whip it earlier too, but keep it covered until you’re ready to spread it on top. So, make that pie ahead for easy entertaining! Just remember: fresh bananas are key.
Banoffee Pie Recipe FAQs
Can I make Banoffee Pie ahead of time?
Absolutely! You can make this dish a day in advance and keep it chilled in the fridge. Just hold off on adding the whipped cream until you’re ready to serve, as it can lose its fluffiness if left too long. When you pour that warm toffee over the biscuit base, let it cool slightly before topping with bananas and cream. This way, your pie stays fresh and delicious!
Why did my Banoffee Pie turn out too runny?
If your pie’s a bit soupy, you might’ve poured the toffee over while it was still too hot or didn’t cook it long enough. That caramel needs to thicken up nicely — think of a rich caramel color. Trust me, patience pays off! Make sure to let everything chill well too; a solid base helps keep things together.
What can I substitute for the heavy whipping cream in this recipe?
If you need a non-dairy option, you can use coconut cream instead, which whips up nicely and adds a fun flavor twist. Just chill your coconut milk overnight, scoop out the solid part, and whip away! But do keep in mind that it won’t taste exactly like traditional whipped cream. So maybe have some extra cocoa powder on hand to balance flavors.
How should I store leftovers of this dish?
Store any leftover pie in an airtight container in the fridge for up to two days. Just be aware that the bananas may brown a bit, so it’s best enjoyed fresh. If you’re worried about that banana browning thing (trust me, I get it), try squeezing a little lemon juice on them before layering — it’ll help keep them looking pretty!
Final Thoughts on Banoffee Pie
The real kicker with this Banoffee Pie is how easily you can whip up that sticky-sweet toffee layer. Seriously, once you get the hang of cooking the sweetened condensed milk with butter and brown sugar, it’s like magic—your kitchen will smell divine, and your taste buds will thank you. If you’ve been putting this off, tonight’s the night. Trust me, it’ll become a go-to dessert in no time! Drop a comment if you added anything—I’m always curious!
Banoffee Pie
Ingredients
Method
- Crush the digestive biscuits into fine crumbs using a food processor or in a zip-lock bag with a rolling pin.
- In a bowl, mix the biscuit crumbs with the melted butter until combined.
- Press the mixture into the bottom of a 9-inch pie dish to form an even base. Refrigerate for 10 minutes to set.
- In a saucepan, combine the sweetened condensed milk, unsalted butter, and brown sugar (if using).
- Cook over medium heat, stirring constantly for about 5-10 minutes until the mixture thickens and turns a caramel color.
- Remove from heat and let it cool slightly before pouring over the chilled biscuit base.
- Slice the bananas and arrange them evenly over the toffee layer.
- In a separate bowl, whip the heavy cream with powdered sugar and vanilla extract until stiff peaks form.
- Spread the whipped cream over the bananas, smoothing it out evenly.
- Dust the top with cocoa powder and add chocolate shavings if desired.
- Chill the pie in the refrigerator for at least 30 minutes before serving to allow the flavors to meld.
- Slice and serve the pie chilled, enjoying the layers of flavor and texture.