
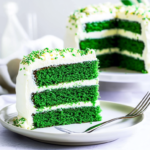
Imagine slicing through a towering Green Velvet Layer Cake, its soft, moist layers beckoning you with a vibrant hue that feels both cheeky and regal. The aroma wafts through the air, sweet and inviting, making you feel like a kid again—perhaps even more excited than when you found an extra cookie hidden in the pantry. Each bite is a delightful dance between fluffy cake and smooth cream cheese frosting, reminding you of family gatherings where laughter mingled with the rich scent of baked goodness.
This cake isn’t just another dessert; it’s the pièce de résistance at birthday parties, holiday gatherings, or even just to celebrate making it through Monday. My first attempt at baking this beauty was met with both awe and confusion from friends, who couldn’t quite believe their taste buds when they encountered this whimsical twist on the classic red velvet cake. Just wait until your friends see it; they’ll be fighting for the last slice!
Why You'll Love This Green Velvet Layer Cake
- This incredible Green Velvet Layer Cake transforms simple everyday ingredients into restaurant-quality flavors that will blow your mind completely.
- Foolproof recipe techniques guarantee perfect results every single time, making even novice cooks feel like professional chefs instantly.
- Stunning visual appeal with gorgeous colors and mouthwatering aromas creates the ultimate Instagram-worthy dish for any special occasion.
- Endlessly adaptable for different dietary needs while working beautifully for meal prep, date nights, or entertaining large groups effortlessly.
Baking this cake is not just about following a recipe; it’s about creating memories, sharing laughter, and indulging in something truly scrumptious. I still remember my friend’s face lighting up when they took that first glorious bite—pure bliss!
Essential Ingredients
Here’s what you’ll need to make this delicious dish:
- Cake Flour: This makes your cake light and airy—no one likes a dense dessert unless it’s chocolate.
- Cocoa Powder: Use unsweetened cocoa powder for that rich chocolate flavor without overwhelming sweetness.
- Baking Soda: This little miracle worker ensures your cake rises beautifully—don’t skip it!
- Granulated Sugar: Sweetness is key here; it balances out all those vibrant flavors perfectly.
- Vegetable Oil: Opt for oil instead of butter for extra moistness—your taste buds will thank you.
- Eggs: Fresh eggs are essential; they bind everything together and add richness to your layers.
- Buttermilk: This adds tanginess and keeps your cake super moist—don’t forget about it!
- Green Food Coloring: The star of the show! Make sure to use gel coloring for vibrant results.
- Cream Cheese: The frosting hero! It brings creamy goodness that pairs perfectly with our green velvet layers.
- Vanilla Extract: A splash enhances every flavor, making each bite heavenly.
- Powdered Sugar: For sweetening the frosting without grittiness—smooth is the name of the game!
- Salt: A pinch enhances flavor and balances sweetness in both cake and frosting.
The full ingredients list, including measurements, is provided in the recipe card directly below.

How to Make Green Velvet Layer Cake
Preheat Your Oven: Start by preheating your oven to 350°F (175°C). Grease two 9-inch round cake pans with non-stick spray so your layers slide out easily.
Mix Dry Ingredients: In a bowl, whisk together cake flour, cocoa powder, baking soda, and salt until well combined. This ensures an even distribution of leavening agents throughout your cake mix.
Create Your Batter: In another bowl, beat sugar and vegetable oil together until smooth. Add eggs one at a time while mixing thoroughly before adding buttermilk and vanilla extract. Stir in green food coloring until you achieve your desired shade.
Combine Wet and Dry Ingredients: Gradually fold the dry mixture into the wet batter until just combined. Be careful not to overmix; we want those lovely air pockets to create fluffiness.
Bake Your Layers: Divide batter evenly between prepared pans and bake for 25-30 minutes or until a toothpick comes out clean from the center. Allow cakes to cool in pans for 10 minutes before transferring them onto wire racks.
Prepare Frosting: While cakes cool, beat cream cheese with powdered sugar until creamy and fluffy. Taste test (it’s mandatory!) before adding more sugar if desired for sweetness.
Now you’re ready to assemble! Stack those beautiful green layers high with generous dollops of cream cheese frosting between them. Don’t forget to frost the top and sides too—it’s all about that presentation!
Your Green Velvet Layer Cake is now complete! Enjoy each slice knowing that you’ve created something not just tasty but also utterly delightful—a perfect centerpiece for any gathering or simply as a treat just because!
You Must Know About Green Velvet Layer Cake
- This showstopping Green Velvet Layer Cake delivers restaurant-quality results using simple ingredients you probably already have at home.
- The perfect balance of textures and flavors creates an unforgettable dining experience that will have everyone asking for seconds.
- Picture-perfect presentation with vibrant colors makes this dish absolutely Instagram-worthy and guaranteed to impress any dinner guest.
- Incredibly versatile recipe that works beautifully for weeknight dinners, meal prep, special occasions, or even outdoor entertaining sessions.
Perfecting the Cooking Process
To achieve the best results with your Green Velvet Layer Cake, start by preheating your oven and preparing your cake pans first. While the oven warms up, mix your dry ingredients separately to ensure they blend well. When the batter is ready, bake the cakes one at a time for even cooking, then allow them to cool completely before frosting. This sequence saves time and ensures that each layer comes out perfectly.
Add Your Touch
Give your Green Velvet Layer Cake a personal spin by experimenting with different frostings or fillings. Consider cream cheese frosting for a tangy twist or a rich chocolate ganache if you prefer something sweeter. You can also add crushed nuts or sprinkles between layers for added texture and flavor. Let your creativity shine, making it a reflection of your unique taste!
Storing & Reheating
To keep your Green Velvet Layer Cake fresh, store it in an airtight container at room temperature for up to three days. For longer storage, refrigerate it for about a week or freeze individual slices wrapped tightly in plastic wrap for up to three months. Reheat slices in the microwave for about 10-15 seconds to warm them slightly before serving.
Chef's Helpful Tips for Green Velvet Layer Cake
- This professional-quality Green Velvet Layer Cake relies on precise timing and temperature control to achieve restaurant-standard results consistently.
- Master the art of mise en place by prepping all ingredients beforehand, ensuring smooth execution and preventing any last-minute cooking disasters.
- The secret lies in layering flavors throughout the cooking process rather than seasoning only at the end for maximum depth.
- Tip let the finished dish rest for optimal texture and flavor development before serving to hungry guests waiting eagerly.
Creating this cake has brought many smiles and compliments from family gatherings over the years; I still hear my niece saying it’s her favorite dessert!
FAQ
What makes a cake “velvet”?
The term “velvet” refers to the cake’s smooth texture achieved through ingredients like buttermilk and vinegar combined with cocoa powder. This unique combination helps create a tender crumb while maintaining moisture. The result is a light, airy cake that melts in your mouth with every bite.
Can I make this cake gluten-free?
Absolutely! To make a gluten-free version of the Green Velvet Layer Cake, simply substitute all-purpose flour with a gluten-free blend that measures cup-for-cup like Bob’s Red Mill 1-to-1 Baking Flour. Ensure that other ingredients like baking powder are gluten-free as well to maintain that delicious velvet texture.
How do I prevent my cake from doming?
To avoid doming, use an oven thermometer to ensure accurate baking temperatures and place your cake pans on lower racks during baking. Additionally, consider using baking strips on your pans; these help distribute heat evenly and promote flat tops.
What can I use instead of food coloring?
If you’d prefer not to use food coloring in your Green Velvet Layer Cake, consider natural alternatives like pure beet juice or spirulina powder to achieve that vibrant hue while adding unexpected health benefits! Experimenting can lead to delightful surprises.
Conclusion for Green Velvet Layer Cake
Making a Green Velvet Layer Cake is not just about following a recipe; it’s an opportunity to unleash creativity and share joy with loved ones. By perfecting your cooking process, customizing flavors, and properly storing leftovers, you’ll ensure that this stunning dessert remains a centerpiece at any gathering you host! So roll up those sleeves, gather friends around, and let’s bake something unforgettable together!
Green Velvet Layer Cake
Green Velvet Layer Cake is a whimsical twist on the classic red velvet dessert, bringing a vibrant hue and delightful flavor to your celebrations. This moist and fluffy cake, layered with rich cream cheese frosting, is perfect for birthdays, holidays, or simply as a special treat. With easy-to-follow instructions and accessible ingredients, you’ll impress your friends and family while creating memorable moments together.
- Prep Time: 20 minutes
- Cook Time: 30 minutes
- Total Time: 50 minutes
- Yield: Approximately 12 servings 1x
- Category: Dessert
- Method: Baking
- Cuisine: American
Ingredients
- 2 ½ cups cake flour
- ½ cup unsweetened cocoa powder
- 1 tsp baking soda
- 1 tsp salt
- 1 ½ cups granulated sugar
- ¾ cup vegetable oil
- 3 large eggs
- 1 cup buttermilk
- 1 tbsp green food coloring (gel)
- 8 oz cream cheese (for frosting)
- 4 cups powdered sugar (for frosting)
- 1 tsp vanilla extract (for frosting)
Instructions
- Preheat your oven to 350°F (175°C). Grease two 9-inch round cake pans.
- In a bowl, whisk together flour, cocoa powder, baking soda, and salt until combined.
- In a separate bowl, beat sugar and oil until smooth. Add eggs one at a time, mixing well. Then add buttermilk and vanilla extract. Stir in green food coloring.
- Gradually fold the dry ingredients into the wet mixture until just combined.
- Divide batter evenly between pans and bake for 25-30 minutes or until a toothpick comes out clean. Cool in pans for 10 minutes before transferring to wire racks.
- For frosting, beat cream cheese and powdered sugar until creamy; add more sugar to taste.
- Stack the cooled cake layers with frosting in between and frost the top and sides.
Nutrition
- Serving Size: 1 serving
- Calories: 320
- Sugar: 30g
- Sodium: 220mg
- Fat: 15g
- Saturated Fat: 3g
- Unsaturated Fat: 10g
- Trans Fat: 0g
- Carbohydrates: 43g
- Fiber: 1g
- Protein: 3g
- Cholesterol: 40mg
Keywords: For added flavor, consider using flavored extracts or adding crushed nuts between layers. If desired, you can substitute gluten-free flour for the cake flour for a gluten-free version.


